Hello hello my lovely people.
What a busy week I have had with my husband's birthday on Sunday, I didn't have much time time in my craft room. Kids also returned to remote learning as of Monday. So far so good, no tears.....yet haha.
Okay so I have had the Stampin' Up Peony Garden Designer Series Paper (DSP) for well over a month and just could not bear to cut it up and use it. I'm sure I'm not the only one. But as Kylie Bertucci (my upline) would say, if you love it, chop it.
So I took the plunge and cut up one sheet of each design into card front sizes so that they are ready to be used. Best decision, as I now find myself wanting to use them given the initial daunting slice has been made.
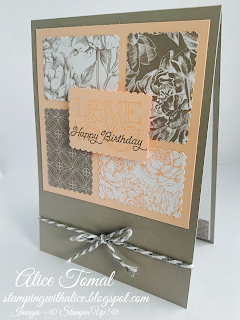
What to do once you have cut up the card? Well for me, whilst I still had the courage, I punched them out to even smaller pieces using the Posted for You punch 😱 and came up with this card. Now originally I did want to use the grey granite shimmer ribbon which comes with the Prized peony suite but I didn't have any on hand and well, I'm not the most patient person hahahaha so I went ahead and substituted it for some grey and white twine.
So less chit chat and onto the card.
Stamps/Dies:
- Posted for you stamp and punch bundle
Cardstock
- Grey granite card base standard size 14.9cm x 10.5cm or 5 1/4" x 4"
- Petal Pink layer 9.7cm x 9.7cm or 3 1/2" x 3 1/2"
- Whisper White Card layer for the card insert 14.1cm x 10cm or 5" x 3 3/4"
- Small piece of Petal Pink punched out with the Posted Stamp punch
- A few sheets of your favorite DSP from the Peony Garden
Ink
Petal Pink
Grey Granite
Adhesives
Multipurpose Liquid Glue
Mini Glue Dots
Dimensionals
Other
Twine or Ribbon to embellish.

First, I took the small piece of petal pink cardstock and punched it out using the rectangle postage stamp punch.
I stamped it with the "love" stamp from the Posted for You set. I used Petal Pink ink and stamped off first on some scrap paper. Without reinking it, I stamped it on my punched out petal pink piece so its a lot lighter, as I wanted it more as background. I then stamped "happy birthday" over the stamped love image in grey granite like so:
 Next I punched out 4 pieces using my favorite DSP and arranged them on the square Petal pink layer.
It did take me a bit of shuffling around to get the paper arranged in the a way that I liked. But once I was happy with how it looked, I then glued them down using the liquid glue so that I had wiggle room to straighten them if needed so it looked like this:
Once they were all glued on, I popped the pink petal piece with our sentiment on some dimensionals and stuck that right in the middle. I then glued this layer on the top half our our grey granite card base, as I did want to leave some space on the bottom half for our twine.
I did have a scrap of DSP which I adhered to the bottom of our whisper white layer and then glued that on inside to be used as our card insert (see picture below)
Lastly, I cut out some twine I had, and tied it into a cute little bow and adhered that onto the front card base with a mini glue dot.
And that is it, a simple card and the hardest part was really just bringing myself to cut up the beautiful paper but I'm so glad that I did.
Until next time, stay safe and chop up your paper 😁


0 Comments